
Blog
Blog
With tons of input options and routing possibilities, the CONNECT 6 is the perfect tool to record a podcast. In this blog article, we’ll look at 4 different possible setups, from a simple solo podcast to a complex interview with multiple guests.

A monologue style podcast is the easiest in terms of setup. In addition to the CONNECT 6, you only need three other items to begin:
A microphone
An XLR cable
A Digital Audio Workstation (DAW)
A quiet room with minimal reflections
Follow these steps to set up your podcast:
Connect the microphone to the CONNECT 6 using inputs 1 or 2.
In the LEWITT Control Center, click the AUTO SETUP button to quickly get customized settings for your voice.
AUTO SETUP process
Choose what type of microphone you are using. Choose “Condenser” if you have a microphone that requires phantom power.
Select “talk”, since we are recording dialogue.
AUTO SETUP will ask if you are live or recording. Select “live” for more processing like noise-reduction and compression or “recording” for minimal processing.
AUTO setup will ask you to speak into the microphone for 10 seconds in order to adjust proper input gain and setup any dynamic processing.
If you selected “live”, AUTO SETUP will ask for silence in the room for 10 seconds while it analyzes the amount of background noise and sets the expander.
Create a new audio track in DAW using (input 1), and then record-enable your track.
That’s it, you’re ready to record your podcast!

The next setup we’ll talk about is an interview-style podcast, with two people in the same room having a conversation. Just like in the last example, you can use Auto-Setup to get your levels dialed in quickly.
In your room, position the host and the guest facing each other to isolate who is talking and get the least amount of microphone bleed.
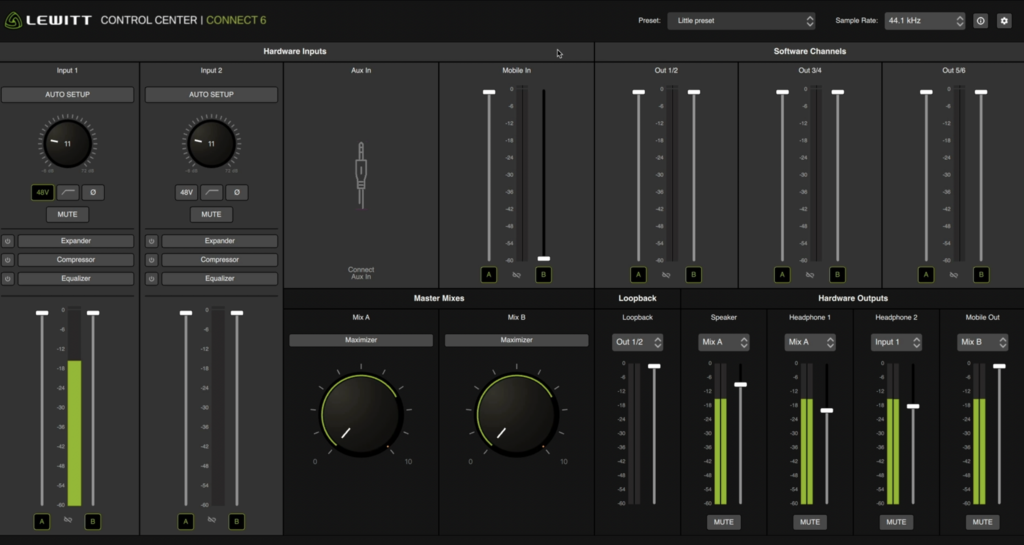
If you want to monitor yourselves with headphones, the CONNECT 6 has you covered with two different headphone outputs, and independent volume controls for each output. You can also dial in custom mixes.
How to set up your custom headphone mixes:
For this example, imagine you are on input 1, and a guest is on input 2. You want to hear everything in our headphone mix, but our guest doesn’t want to hear their own voice in theirs.
The CONNECT 6 offers two different mixes (Mix A and Mix B) to accommodate this. In this case, you can use Mix A for your “everything mix”, and Mix B will be “everything minus input 2”
Ensure the “Mix A” (your voice) sliders on input 1 are up all the way.
On input 2, ensure the “Mix B” (guest voice) slider is set all the way down.
In the Hardware Outputs section, select “Mix A” for headphone output 1 (your output)
Likewise, for the guest’s headphone output, select “Mix B”
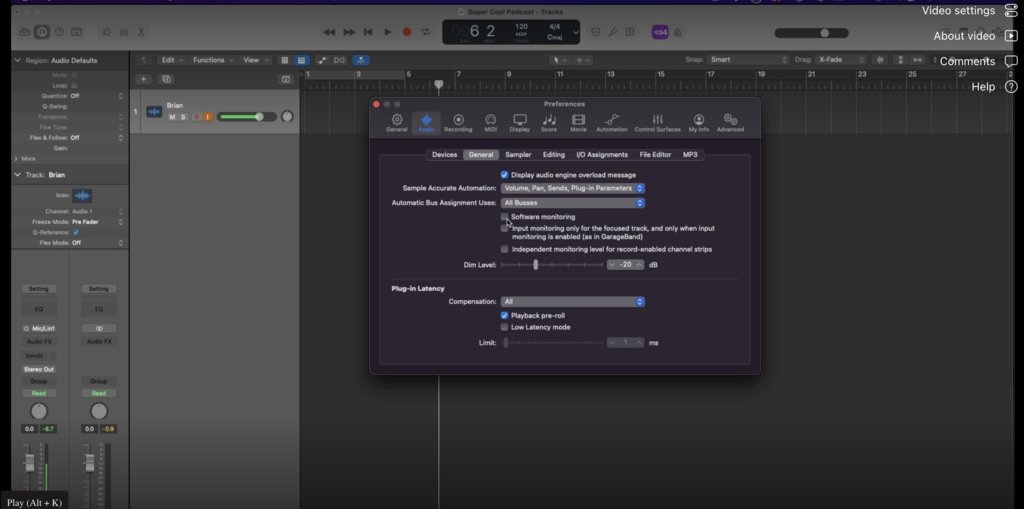
In your DAW, make sure you have disabled “software monitoring” so you don’t hear duplicate audio in your headphones. In Logic, this is under Preferences > Audio > General
Create tracks in your DAW for each guest. Use inputs 1 & 2 for each track, respectively.
Now you’re off and running!

Another common setup is an interview-style podcast where you have two people in a room, and one person calling in remotely through a VoIP service like Zoom on the same computer you’re using to record.
For the guests that are in the same room, use the same processes we showed in the last two examples for setting up separate mixes and running AUTO SETUP.
If you have someone calling in remotely, you will also need to record sound from the remote guest. In this case, you’lll need to use the CONNECT 6’s Loopback feature. Loopback routes your computer’s audio back onto a pair of input channels so you can record them in another application.
Follow these steps to set up a session with Loopback:
1. In the LEWITT Control Center, select “Output 1 / 2” in the dropdown menu above the Loopback channel. (This is typically the standard output used by applications like Zoom)
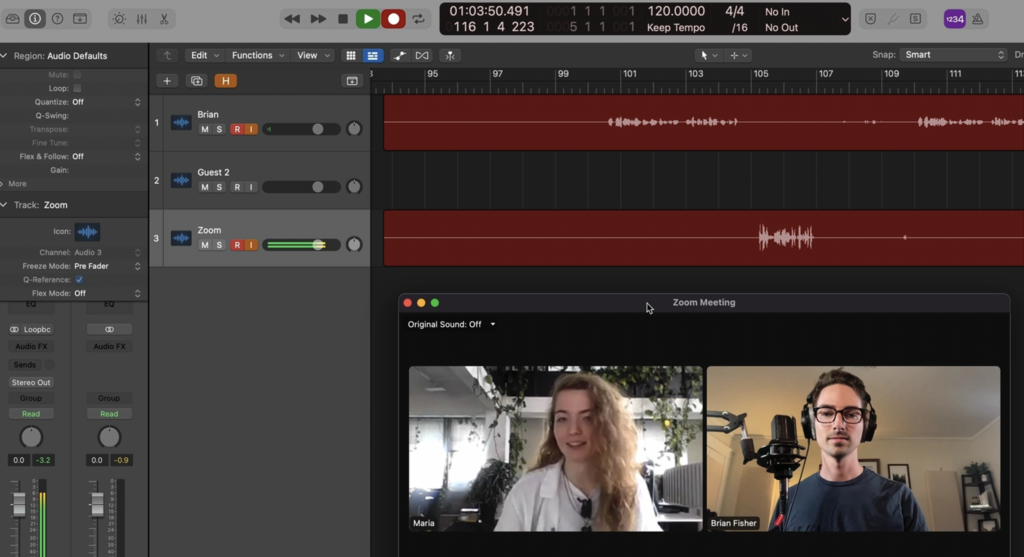
In your DAW, set up three audio tracks.
For guest 1, set your audio track to CONNECT 6 Input 1
For guest 2, set your audio track to CONNECT 6 input 2
For the remote guest, create a stereo track set to CONNECT 6 input 7 / 8 (the Loopback channels)
Now your remote guest can be recorded on their own track.
Headphone monitoring for your remote guest
Please note it isn’t possible to create a unique headphone mix for your remote guest, and so you will likely need to rely on the remote application’s noise removal capabilities to avoid feedback of the guest’s voice. Applications like ZOOM and Skype include such features.

The final setup we’ll talk about is where you have two people in the same room, one person calling in remotely over zoom, and a fourth guest calling in via mobile device. The CONNECT 6 makes this seemingly complex setup surprisingly easy!
As before, you’ll want to run AUTO SETUP for your two guests in the room to ensure their microphone audio sounds the best in can. In addition, you’ll want to set up your remote guest on your Loopback channel in the same way you did previously, using inputs 7 / 8 in your DAW.
The CONNECT 6 uses a dedicated Mobile In/Out port that makes it easy to stream audio to your mobile device, or record audio from it. In this example we’ll show you how to set it up so that everyone can hear each other, and so that you can record the mobile caller onto a separate track in your DAW.
Follow these steps to set up your Mobile Input and Output routing:
Plug in your mobile device to the MOBILE port on the back of the CONNECT 6. You will see faders appear on the corresponding input in CONTROL CENTER
Create two mixes, one for the guests in the room, and one for the mobile caller.
Ensure the Mobile input is sent to Mix A with the Mix A slider
Set input 1 and 2 to mix B
Turn down the Mix B fader on the MOBILE input in CONTROL CENTER
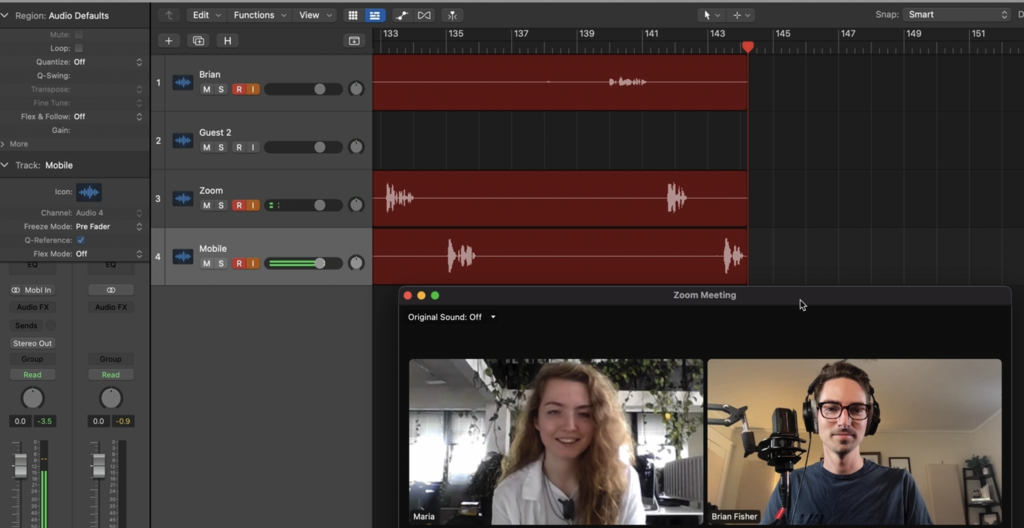
In your DAW, create another stereo track for your mobile caller. Use inputs 5 / 6 in your DAW, which corresponds to the left and right channel of the mobile input on CONNECT 6.
Hopefully you’ve found these tips helpful in setting up a podcast configuration that suits your needs. The CONNECT 6 is highly flexible and lets you set up routing any way you want, so your methods might differ from ours. Let us know on social media what kind of podcasting setups you’ve tried with CONNECT 6!
To learn more about the CONNECT 6, visit our product page.