Blog
True love for great sound unites us.
Blog
True love for great sound unites us.

Have you ever needed to record the audio from an application on your computer, like a music player or game? If you have already tried, you might have found out that it's harder than it sounds!
There are two common ways to route the audio from the output back into the input.
Setting up third-party software can be complicated. However, there are audio interfaces (professional sound cards) that feature a dedicated loopback channel, making it easy to integrate all kinds of audio into your podcast, streaming, or music production process.
Let's help you find the right solution for your setup.
Audio interfaces with loopback
You can imagine Loopback like a cable that runs from your computer’s audio output back into an input, except Loopback works digitally without physical cables.
“Loopback” refers to the routing of the audio output from your computer applications back into an input.
Loopback, therefore, lets you record audio from computer applications and control that audio separately from your other input sources.
There are a lot of cases where you’d want to record your computer audio. Here are just a few interesting examples, and you may think of more!
Record a podcast with a remote guest
If you have a remote guest calling into your podcast via an app like Zoom or Teams, you can route that audio via the Loopback channel. You’ll be able to easily record your guest on a separate channel in your DAW. Check out our blog on how to record podcasts.
We also have a video covering this topic using the LEWITT CONNECT 6 audio interface -> Click to watch here
Add live sound effects to your podcast
If you want to spice up your podcast with sound effects or funny clips, Loopback is the perfect tool for you. For example, you might want to fire off a one-shot sound effect. And you might want to take them from:
Go to your audio recording software, create a track, and set your loopback as an audio input.
(For CONNECT 6, the loopback channel shows as input 7/8.)
If you now play back the sound, you’ll be able to record it on the prepared track. All recorded sounds can then be used whenever needed.
Make a reaction video
If you’re making a screen recording of any kind, whether it’s for a reaction video or an on-screen tutorial, you may find the video's sound is very loud. With loopback you'll have separate control over your computer and microphone audio, so you can change levels of your computer's background audio and your voice can be heard more clearly.
You can follow the same steps as above to set this up.
Game streaming
Streaming or recording game audio can be tricky because these applications are often very loud and dynamic, which can overwhelm your voice. It gets more complex when livestreaming, since your voice must be loud enough to be heard by your audience, who also would like to hear the audio from the game.
The loopback feature alleviates this problem by capturing game and microphone audio separately. You can create separate monitor mixes for yourself and your audience if you are streaming live.
Record reference tracks into your DAW
A reference track is a piece of recorded audio that’s used by a mixing or mastering engineer to compare to a project they are working on. However, it can often be challenging to find a high-quality audio file of a specific reference track you may be seeking. Using Loopback, you can easily record a reference track directly into your session from your audio player or streaming app. Be aware this is for your personal use only!
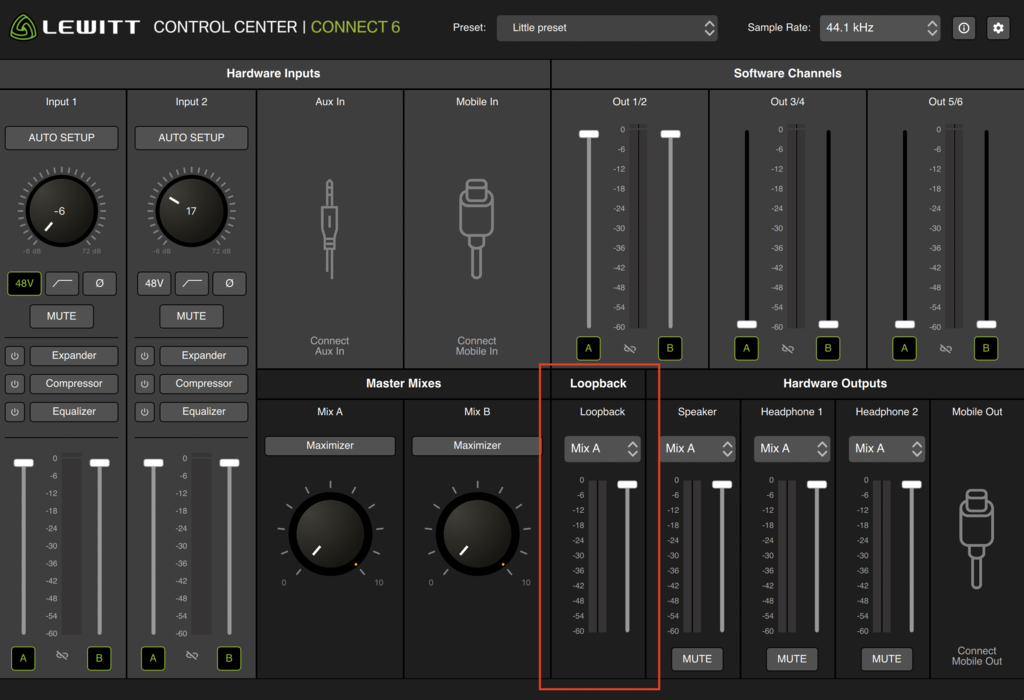
Loopback can be managed in CONTROL CENTER. You can find the Loopback channel next to the Hardware Outputs section, highlighted in the screenshot below:

You can select a source for Loopback from among the outputs available, but Out 1/2 is typically the default for your computer system audio.
Rather than a traditional output, Loopback works as a digital channel within CONNECT 6. It’s also a selectable input that shows up in your DAW on stereo input 7/8.
That’s all you need to do to set up Loopback for the use cases we listed above. Now, any audio playing from an app on your computer will go into your DAW on the channel set to Input 7/8.
With all the routing flexibility available in CONNECT 6, it’s easy to overlook loopback. But once you master it, you may start finding all sorts of excuses to use it.
We hope this article was helpful in learning about Loopback - let us know on social media about your own experiences with this handy feature!
LEWITT Audio Interfaces