Blog
Blog
Your mix is finally coming together; all the parts sound just right after all those hours you put in. Who needs a break when you are having this much fun?
A little later, you visit friends and can't wait to play your track for them. The excitement grows as you finally hit play.
But what is that? It sounds nothing like the glory you experienced before. In fact, it sounds rather awful. Quickly, you check the file name, but it is the correct one: Final-final-final-mix-V17
What happened?
Don't worry, we have all been there. In this blog, we will give you some pointers so you can learn how to avoid such frustrating moments.
Checking your mix often allows you to give yourself constructive feedback and helps to identify issues as early as possible.
Knowing where and why your mix took a wrong turn is essential. There are methods you can learn to become aware of the possible pitfalls. We have listed several techniques to help you get better mixes by implementing only a few easy changes.
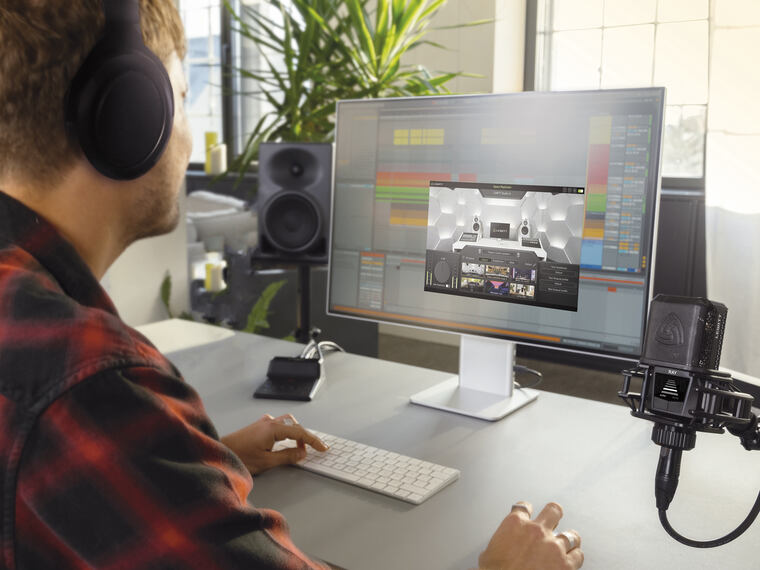
To create mixes you can trust, you need a reliable acoustic environment.
This could be an acoustically treated mixing room or a good pair of headphones.
If you use speakers in a room, you need to ensure that your room acoustics don’t create peaks or dips in specific frequencies that might lead to mixing decisions that only make sense for your setup—decisions that won’t translate well to other playback devices, such as small speakers, headphones, or even a smartphone.
Headphones are independent of your space, but they create an exaggerated stereo field, making certain mixing decisions more challenging to judge.
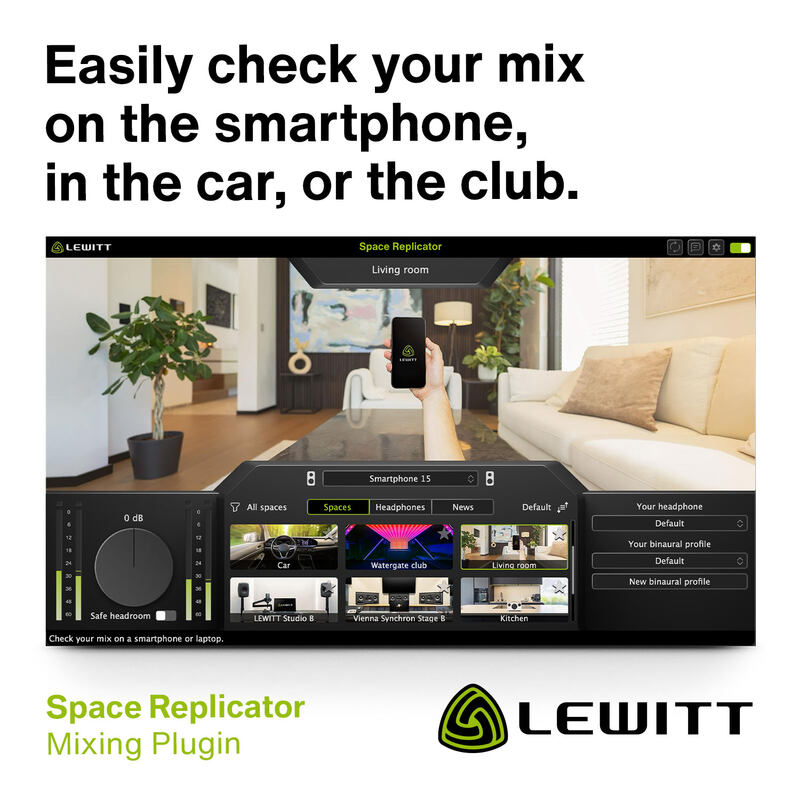
The best solution for mixing on headphones is a plugin called Space Replicator, which brings the sound of professional studio speakers to your headphones. You can also use it to hear your mix on different playback systems—such as a smartphone, a car, or even a club PA—so you can ensure your mix sounds great everywhere.
Using a reference track is powerful because you have something to compare your mix to. It provides you with a guideline and refreshes or resets your ears.
Like cheese is used during wine tasting to clear the palate, comparing your mix to a reference will make it much easier to tell when something is off. Remember that the goal is not to copy the reference but to use it as a guide and reset your ears.
Pick a track similar to yours (genre, instrumentation, vibe) for the best results.
Match the level of the reference track to your mix!
Tip: Want to take it a step further? LANDR’s Reference Mastering lets you upload your track + a reference track. You can get your song to match the EQ, loudness, and overall feel of the reference track. This way, you can easily hear if your mix holds up to your favorite music.

When comparing two sounds, our ears will always prefer the louder one. So, turn the reference down until you perceive it at the same level as your mix. Don't worry if that means turning it down by a lot. This is entirely normal.
Remember, your reference track is already mastered. Your mix is not.
Ensure you don't apply processing to your reference - a compressor or limiter on your master bus, for example.
Our hearing is not linear, and it changes with different levels. So, it is essential to check your mix at various levels.
The bulk of the mixing process should be done at moderate levels to avoid ear fatigue or, even worse, hearing loss.
Listen at low volume to check if you can still hear all the instruments or understand the lyrics.
Turn the volume up to check the bass and listen for harshness or frequencies that hurt your ears.
Switching between your mix and your reference track lets you quickly tell if your mix is too bright, muddy, or has other balancing problems.
A helpful technique is to solo the lows, the mids, and the highs to find problems within each frequency range. You can do this with an EQ. It works like a zoom, allowing your ears to focus and listen for mistakes.
Isolating a frequency range helps to find mistakes.
I recommend checking the whole mix without the bass. It often distracts from issues that become obvious once it is gone. Try to find the spot where you only hear the bass and the bass drum. Use a hi-cut filter and sweep until you just hear the kick drum and the bass. Then switch the filter to a low-cut. This technique also tells you if your bass has enough lower-midrange content to work on small speakers.
Are your guitars panned wide enough? Is your whole mix too narrow? Again, comparing your mix to the reference track will help you get answers and improve your results.
You can also use a phase correlation meter, but learn to listen for the differences. It is a valuable skill that will help you in the long run.
A narrow mix will feel "small" compared to your reference track, while an overly wide mix will sound "phase-y" and weak.
Also, check the depth perception/spaciousness. The most important instrument or vocal should be in the front, while less "important" signals should be in the back. A track with too much reverb will sound washy and undefined, while a too-dry mix will sound one-dimensional.
It might sound counterintuitive, but checking in mono is often the best thing to do to a stereo mix.
When two instruments clash, and you pan them to opposite sides, it might sound like you solved the issues, but they are still there. You just pushed the problem to the side.
Once you switch to mono (also called collapsing to mono), the competing instruments suddenly are on top of each other again. It is much easier to identify problem areas and EQ them properly.
Checking your mix in mono will make your stereo mix sound better.
After you make your adjustment in mono, you will be highly rewarded once you switch back to stereo. Not only will your mix suddenly sound huge, but you will also gain punch and clarity!
Nerd fact: the issue of signals "fighting" in the same frequency range is called the "masking effect".
Understanding what your mix will sound like to your target audience is vital.
Music sounds different in a club than on Bluetooth speakers or a phone.

Check your mix on several devices to ensure it "translates" well. I recommend consumer speakers, headphones, a car, and your phone. (Of course, if you work on electronic music and have access to a club, go for it!)
Check your mix on different devices for great results.
And last but not least, always check on the system you are most familiar with. Whether it's earbuds or a hi-fi system does not matter. What matters is that you spent countless hours listening to this device, and you know how great music should sound on it.
Related stories
How to mix electric guitars
Getting your guitars to sit right in the mix can be tricky. But it doesn't take much to get your guitars where you want. This blog will show you 5 easy tricks…
The best free VST reverb plugins in 2024
Life as a music producer is not easy. Fortunately, some ultra-motivated developers can empathize and provide their plugins so creatives can be creative. This is…
Mixing on headphones
To make great mixes, you need to hear your music accurately and in detail across the frequency spectrum. Without a well-tuned, acoustically treated studio, this…