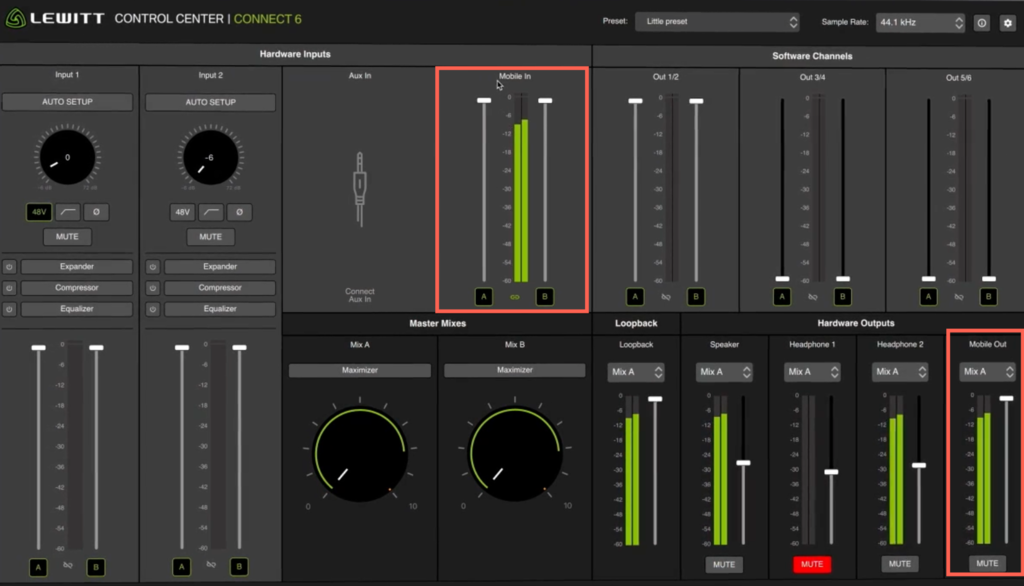
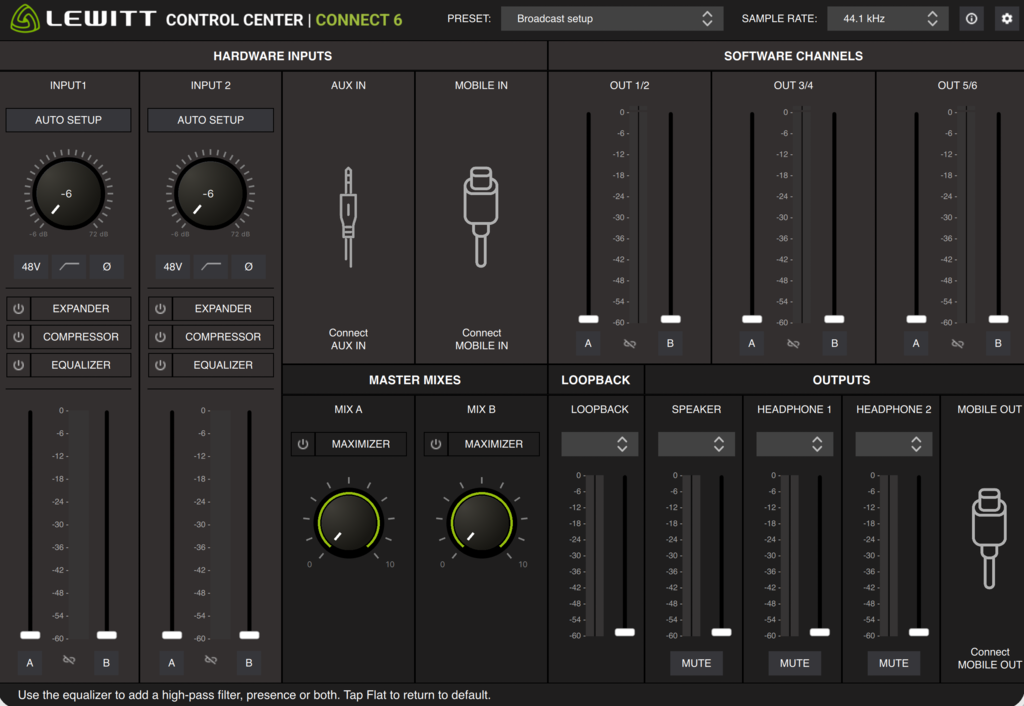
Online guide

CONNECT 6

Register with myLEWITT and get free software.

  • What's included?

    • CONNECT 6 audio interface
    • USB C to USB A cable
    • USB C to USB C cable
    Box contents CONNECT 6
  • Downloads

    Here you can download the latest version of CONTROL CENTER, including the latest drivers and firmware.

  • Firmware updates and new features

    Firmware updates are automatically distributed via the CONTROL CENTER. 

    You can find the latest firmware version in the settings panel under "Updates and maintenance".

    If you want to find out more details about releases and updates click here

    If you receive the following error message after the firmware installation process, please simply power cycle your CONNECT 6 once by unplugging the interface and plugging it back into your computer. error message


  • Getting started

    To use CONNECT 6 with a computer, follow these steps. 

    1. Download LEWITT CONTROL CENTER software

    2. Connect CONNECT 6 to your desktop or laptop computer using the supplied USB cable.

    3. Set CONNECT 6 as the default audio device in your system or audio settings.

    That's it! Now you're ready to go.

    What is the CONTROL CENTER?

    The CONTROL CENTER is a special desktop program/installation package for CONNECT 6 that is compatible with both Mac and Windows operating systems. It allows you to control the advanced functionality of CONNECT 6 and its features.

    1. How to redeem included software

      • Register your product at myLEWITT
      • Create a Steinberg Account
      • You'll receive a confirmation email with an activation link from us
      • Download and install your software
      • Have fun!

      Go to myLEWITT

    2. Inputs/outputs

      CONNECT 6 connectors

      Computer: Connect the CONNECT 6 to a computer via the provided USB C cable. This connection also powers the CONNECT 6 depending on the power supply of your USB port.

      Power: Connect to a power supply if your USB port can't provide enough power, especially when you connect a mobile device or use the CONNECT 6 as a stand-alone mixer without a computer. Find more info in the section "Powering CONNECT 6".

      Aux: Send audio to CONNECT 6 via a 3.5 mm (1/8 inch) stereo cable from a source such as a pocket synth, tablet, or other instruments.

      Mobile: Connect your mobile device via USB-C for lossless digital audio transfer while conveniently charging it simultaneously (depending on your USB port power supply or if you have connected an additional charger to the "Power" port). You can send high-class audio to mobile applications or record audio from your mobile device onto your computer.

      Alternatively, you can connect a 2nd computer instead of a mobile device to send and receive audio between two computers digitally.

      Output R/L: Use this output to send audio via a 3.5 mm (1/8 inch) stereo cable to speakers or other audio devices.

      Output: Use the 6.35 mm (1/4 inch) outputs to connect studio speakers via balanced TRS cables.

      Inputs 1 & 2: These two XLR/Line 6.35 mm (1/4 inch) combo jacks let you connect XLR microphones or line-level sources like synths and keyboards. 

      Headphone outputs: Connect headphones via 3.5mm or 6.35mm cable. 

      All specs are available on the CONNECT 6 product page

    3. Mobile and aux connections

      CONNECT 6 is compatible with mobile devices and can send and receive audio through a single USB-C port while charging it (see the "Powering CONNECT 6" section of this guide for more information).

      Connect your mobile device to the USB-C port labeled "Mobile" and the input and output meters will appear in the CONTROL CENTER, allowing you to route the audio as needed.  

      mobile

      Mobile in

      To record audio from your mobile device, select inputs 5/6 on a record-enabled stereo channel in your DAW, play audio from the device, and hit record in your DAW.

      Mobile out 

      To send audio to a mobile device, go to the "Mobile out" dropdown options in CONTROL CENTER and select the source you'd like to send from the dropdown list. You can select loopback to send system audio from your computer or create custom mixes using the Mix A or B options. Adjust the faders to send the signal to either Mix A or B and select that as your source for MOBILE OUT.  

      You can even use CONNECT 6 as a standalone device, and it will save the last settings you dialed in through Control Center. This can be a great option if you want to set up a live stream through your phone and don't want to deal with the hassle of additional screens and controls.  

      Connecting an auxiliary source

      Now you can finally "pass the aux" in the studio! Connect any line-level audio source via a 3.5 mm stereo cable (not included) to the AUX input on the CONNECT 6. Once you've made the connection, the signal level will be displayed on the AUX input in CONTROL CENTER.

      The AUX input works great when playing reference audio from a mobile device, using a pocket synth, adding backing tracks to a stage performance, and more!

    4. User interface (hardware)

      CONNECT 6

      1. Rotary Knob

      This knob lets you control multiple functions on the CONNECT 6. Press it to switch between your input and output channels, and rotate it to adjust the gain and output levels.

      2. Input 1 and Input 2

      Displays which input channel is selected. The colors indicate how hot the input signal level is.

      GREEN: -40 to -12 dB

      YELLOW: -12 to -1 dB

      RED: Signal is over -1dB

      3. Headphones 1 and 2

      To select and set the headphone levels for each headphone output channel, press the knob until the desired channel is highlighted. Then, rotate the knob to set the volume.

      4. 48V phantom power

      Indicates whether phantom power is active on the selected input. Phantom power can be turned on or off from the software interface or by selecting an input channel and holding the rotary knob for five seconds. 

      5. Speaker output

      To select and set the speaker output level, click the rotary knob until the speaker icon is illuminated. Then, rotate the knob to set the volume. The LED will change to display the amount of gain on the output channel.

      Level meters

      These indicate both the Input and the gain levels of the selected channel. If you've selected an input, both the gain level of the channel and the level of the incoming audio signal will be displayed. If you've selected headphones or speaker outputs, the level will be displayed on both meters.

      Top bar: displays the amount of input gain when the knob is turned on Input 1 and 2. 

      Bottom bar: indicates the input level of the incoming audio signal on Input 1 and 2. 

    5. User interface (CONTROL CENTER)

      LEWITT Control Center

      Global

      Here you can easily recall your favorite processing and signal routing settings with the Presets menu, change the sample rate of CONNECT 6 from 44.1, 48, and 92 kHz, and access Help documentation and Settings.

      Inputs

      Here you can control the input gain of your audio on inputs 1 & 2, run Auto Setup, handle phantom power (48V), add a low-cut filter, or invert phase.
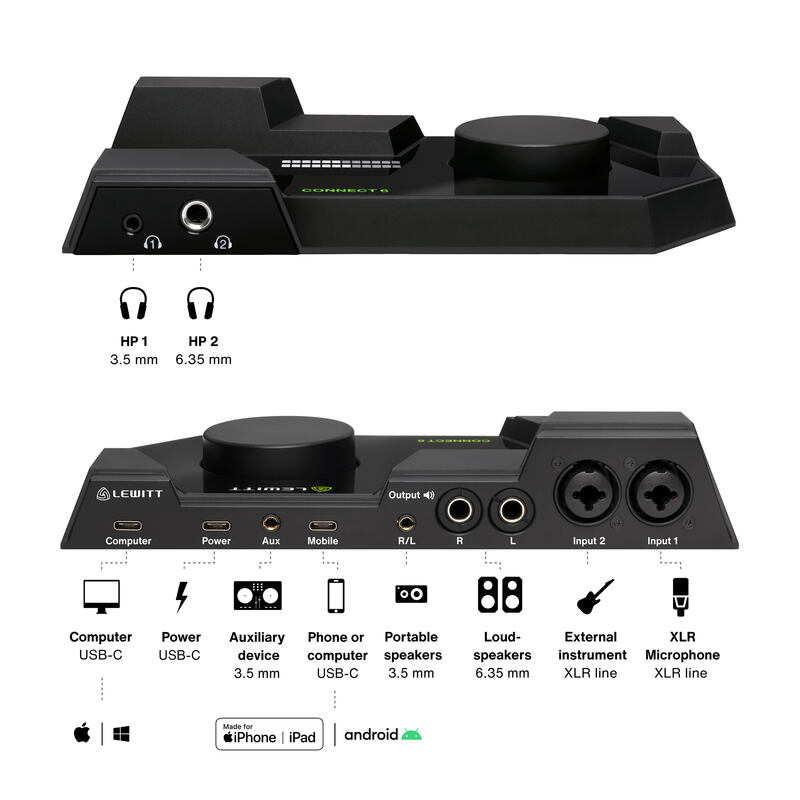
      Aux & Mobile in
      These inputs become active once you connect a source to MOBILE IN or AUX on the CONNECT 6.

      Plugins
      A Compressor, expander, and an equalizer are available for use on inputs 1 & 2. For more information, see their respective sections in this guide.

      Master mixes

      You can create two separate mixes using various sources: "Mix A" and "Mix B". For each channel, use the faders labeled "A" and "B" to adjust the volume level for each separate mix, or use the "A" and "B" buttons to toggle audio on/off for each mix.

      As you increase the "Maximizer" knob, you will add gain to the signal until it reaches the maximum threshold, at which point gain reduction will be applied to keep the signal from clipping. The amount of gain reduction (if any) will be displayed in yellow alongside the knob.

      Software outputs

      CONNECT 6 routes audio through three separate software output channels labeled "1/2", "3/4", and "5/6". Select these virtual channels in your respective software (system audio, browser, games, Zoom, Discord, etc.) to control the audio directly in the CONTROL CENTER.

      For each channel, use the faders labeled "A" and "B" to adjust the volume level of the A & B sub-mixes, or use the "A" and "B" buttons to toggle audio on/off for each master mix.

      Hardware outputs

      This section lets you control the volume levels and the source of each hardware output available on CONNECT 6. You can choose the source for each output from any available hardware input, the two master mixes, or software output channels.

    6. Plugins and onboard effects

      The CONNECT 6 offers a suite of effects plugins powered by onboard DSP that help you get the best possible sound quality without introducing any latency into your recording session or using precious CPU power. 

      These plug-ins are available on inputs 1 & 2 via the CONTROL CENTER software. 

      Plugins

      EQUALIZER

      This four-band graphic EQ helps shape the tone of your input source. Click and drag the nodes in the graphical window to adjust per-band gain and frequency. Hold CMD (Mac) or CNTRL (Windows) while adjusting the node to change its Q value.

      Select your filter type for each band from among five options: Lowcut, Lowshelf, Notch, Peak, Highshelf, Highcut. Individual bands can be toggled on/off.

      COMPRESSOR

      The compressor helps to control dynamics by attenuating the signal when its volume reaches a set threshold. You can use compression to add excitement to your audio as well as "even out" overly dynamic performances.

      Threshold: Set the volume level at which compression (signal attenuation) takes place
      Ratio: Controls the amount by which the signal is attenuated once it passes the threshold. 
      Attack: Controls how quickly the attenuation reaches its max value. 
      Release: Controls how quickly the attenuation returns to zero once the audio signal falls back below the threshold. 

      EXPANDER

      Sometimes referred to as a "gate", the expander provides the opposite function of a compressor: It turns DOWN the volume of a signal that falls BELOW a set threshold. 

      Threshold: Set the volume level at which the signal attenuation takes place. At lower levels, attenuation occurs less often.
      Ratio: Controls the amount
      of gain reduction while the signal is below the threshold.
      Attack:
      Controls the speed with which the expander will open and let the signal pass through once it exceeds the threshold. A short setting will be ideal for most sounds, especially vocals.

      Release: Controls the time the expander needs to fully dampen any noise once the signal goes below the threshold. Reduce the release time to cut away noise instantly after the signal stops. Make the release time longer to create a smooth and less audible transition.

      Maximum reduction: Set the maximum noise reduction that the expander should provide.

      REVERB

      There is an easy solution that lets you use reverb on your CONNECT 6. You can find the step-by-step instructions here.

      Watch tutorial

    7. Reverb for CONNECT 6

      There is an easy way to use reverb with your CONNECT 6.

      We have prepared easy step-by step instructions here

    8. Auto Setup

      Autosetup helps you to get started by intelligently assigning channel strip and plugin settings based on your recording needs.

      This helps you reach a great starting point without spending too much time tweaking your settings.

      To begin the process, click the Autosetup button and go through the following steps:

      What did you connect?

      Choose whether you have connected a condenser (48V phantom power will activate automatically) or dynamic microphone or if you have connected a line level instrument like a synth or DI.

      Which settings do you want to optimize?

      Choose between advanced and basic. The basic setting just sets your gain level. The advanced option also adjusts the DSP effects for you.

      What would you like to do?

      Choose if you will be singing, speaking, or if you want to play an instrument.

      Would you like to use a low-cut filter?

      Choose if you want to remove low-frequency rumble (recommended for voice) or keep the low end of your sound (recommended for recording bass).

      Let’s test your sound!

      A sound check to determine the proper input gain settings. Click „Start measure”, then perform into the microphone or on your instrument for 15 seconds to complete the process.

      Would you like to use a compressor?

      Activating the compressor is ideal for a finished sound. Keep the compressor deactivated if you want to capture the raw signal and apply compression later.

      Would you like to use an expander?

      Activating the expander reduces background noise. This is the recommended option for any live setup or conference. Keep the expander deactivated if you want to capture the raw signal and reduce your background noise later.

      Now test your ambient noise

      CONNECT 6 will listen to the background noise in your environment and reduce it using the expander.

    9. Mobile device compatibility

      CONNECT 6 is MFi certified for iPhone and iPad and works with your Android device.

      iOS requirements

      The first time you want to connect an iOS device to CONNECT 6, you have to ensure that it is connected to the internet so that the initial communication can occur. This is due to Apple's MFi specification.

      After initially connecting the device, you can disable the internet connection as it is only needed for the first connection.

      How do I know if my iOS device has been properly enumerated?

      Please be aware that it can take up to 10 seconds for an iOS device to establish a proper connection. Upon successful connection, you will see your iOS device charging and selected as an I/O device under the name "CONNECT 6 Mobile" in your iOS control center panel / Airplay settings.

      Non-USB PD type C Android devices

      The CONNECT 6 also supports Android devices that do not feature USB PD. In this case, simultaneous audio streaming and mobile charging are disabled. Devices that feature USB-C connectors but do not support power delivery will only allow you to stream audio and will not charge at the same time.

      Please note

      To ensure 100% compatibility via a USB-A to USB-C connection, connect a phone/laptop charger to the "Power" port providing at least 27W (USB-C PD >27W).

      If you see this error code, your mobile device does not get enough power from the USB port for the connection to work correctly.

      error code

      Sample rate conversion 

      The mobile port supports sample rates of 44.1 kHz and 48 kHz. Depending on the IOS/ Android app that you are using, you may find that the mobile port is requesting a different sample rate than the computer port.

      In these situations, the CONNECT 6 will resample to ensure consistency between the computer and mobile port audio. The computer port is by default the master port when determining which sample rate the iOS/ Android device follows.

    10. Your phone doesn't work?

      The issue usually occurs when the CONNECT 6 is connected to your computer via USB-A.

      To ensure 100% compatibility via a USB-A to USB-C connection, connect a phone/laptop charger to the "Power" port providing at least 27W (USB-C PD >27W).

      If you see this error code, your mobile device does not get enough power from the USB port for the connection to work correctly.

      Power error
    11. Android device support

      CONNECT 6 satisfies the Android USB audio specification and is therefore fully compatible as it has passed the related tests in the Android Compatibility Test Suite. This means we can support USB audio on android devices 10, 11, 12, and 13.

      How certain Android applications deal with USB audio channels and device I/O is unfortunately out of our control, and some applications may not support certain features/ use cases.

      If you encounter issues, we recommend contacting the app's customer support/ developer to confirm whether your use case may be supported in their application using an external USB device for audio capture, playback, and streaming.

    12. Mac/iOS device support

      CONNECT 6 is MFi certified for iPhone and iPad by Apple. 

      How specific Mac or iOS applications deal with USB audio channels and device I/O is unfortunately out of our control, and some applications may not support certain features/ use cases. 

      Specific streaming applications like Zoom and OBS offer a restricted use case on macOS, as they are hardwired only to accept CONNECT 6 software channels 1/2.

      If you encounter problems, we recommend contacting the app's customer support/ developer to confirm whether your use case may be supported in their application/software using an external USB device for audio capture, playback, and streaming.

    13. Powering CONNECT 6

      CONNECT 6 has been designed to run off USB bus power. For this, simply connect your CONNECT 6 to your computer's USB-C or USB-A port via the included cable.

      Please note: To ensure maximum stability during mobile streaming and recording, we recommend connecting an external power supply to charge your phone and provide power to the CONNECT 6, especially if your computer's USB port doesn't provide enough power. This works with any USB-C PD-compliant charger providing a minimum of 27 W.

      Please be aware that connecting or removing an external power source while playing and/or recording audio on the mobile port may result in a short audio interruption.

      CONNECT 6 with USB hubs

      According to our experience, CONNECT 6 works fine with actively powered USB hubs. In cases of insufficient power, please connect a USB-C PD-compliant charger providing a minimum of 27 W to the "Power" port. 

    14. How to get support?

      You can file a bug in the LEWITT CONTROL CENTER in the Settings panel -> Updates and maintenances

      You can always contact our team via email: [email protected]

      We recommend looking at the other FAQs in the CONNECT 6 support section, as they might solve your issue.

    15. Routing tips

      Recording audio into a DAW

      Audio can be routed from the CONNECT 6 to your DAW via the following software channels. Turn off software monitoring to avoid hearing duplicate signal through your headphones. 

      CONNECT 6 inputs
       

      Creating sub-mixes

      Every channel source on the CONNECT 6 offers two separate busses for Mix A and Mix B. You can control the level going into each mix with the faders on each input. You can also mute/unmute the audio going into each mix by clicking the corresponding 'A' and 'B' button on each input.

      Both Mix A and Mix B can be sent independently to any output on the CONNECT 6. This allows you more flexibility and control over your monitoring.

    You can learn more about your product, download files, and check specs.

    Need help?

    Contact us

    Write an email or send us a direct message

    Contact us

    Blog and reviews

    Learn and get inspired.

    Facebook icon YouTube icon Instagram icon zoom-icon