Blog
Blog
Acoustic treatment is one of those topics in audio that just isn't very sexy. You want to use your precious studio budget for fun stuff like a new keyboard or a new multi-effects pedal or a set of new mics; you don't want to spend it on stuff that hangs on your walls and ceiling and doesn't seem to actually do anything.
Sexy or not, acoustic treatment ranges from "a good idea" to "vital". Here's why – and of all the things I'll teach you today, it's the most important...
You can’t trust your work if you can't hear it properly.
It doesn't matter how much expensive studio gear you own. Ultimately, everything you own has to get to your ears, so you can get it ready for other people's ears.
If your ears are fooled into thinking that a mix is perfect when your room is lying about it, it doesn't matter how good your gear is (and that includes your monitors) – your mix won't be perfect.
Here’s the second important thing to learn about acoustic treatment:
Taking the room out of a sound is a lot harder than putting it in.
Everything we record on a microphone has elements of the space in which we record. That can be good if the room has a sound that lends itself to making the recording sound better.
But if the room has acoustics issues that affect the sound negatively, getting rid of those ranges from difficult to impossible. It’s vital to have some control over how the room sounds in order to assure the audio sounds its best.
I've run into seasoned pros who nod and smile and say, "That's true, but I'd still put an excellent mic (preamp, guitar, etc.) first."
Why? You're still not going to hear it properly, no matter how badly you want to believe that you will. Of course, it’s true that the amazing mic you just spent your room acoustics budget on will do a brilliant job of recording how lousy your room sounds...
It's a tough idea to let go of – but the first time you hear a mix in a room that's been acoustically treated, or hear the difference between the vocal you recorded in a treated room and the one you did in a room with acoustic problems, it will all make perfect sense.
Treatment is a great investment, and it doesn’t have to be expensive or difficult.
Most acoustics issues can be narrowed down to a few specific types, and all of those can be summed up in one statement: left to itself, sound doesn't care about your results, and you need to get it to behave – or at least try to.
For most of this article, we’ll talk about mixing, because it’s easiest to illustrate the problems and solutions for that situation. We’ll talk about recording after that. Now let’s get started.
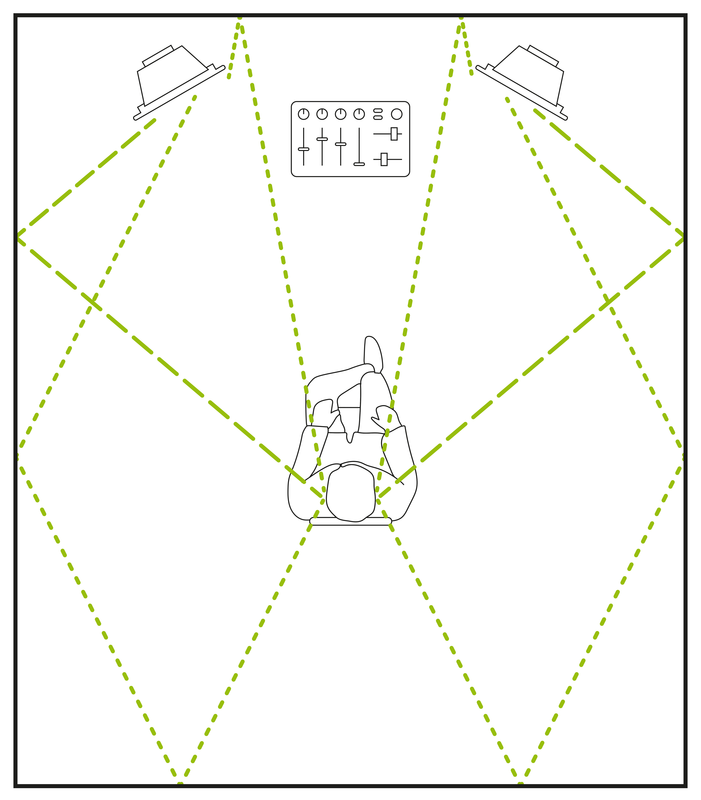
Here's a typical room, with a typical mix position. We can see that the engineer has followed the rules for setting up their monitors
1. The tweeters are aimed directly at their ears.
2. The distance between them is the same as the distance from each one to their ears.
3. They're oriented as recommended by the manufacturer – usually pointed straight at each ear.
Now it's time to see what the room does.
If your manufacturer doesn’t make recommendations in the manual, these rules are a very reliable place to start. Don’t ignore them; they will merely add problems to the ones your room already has.
One of the easiest things to cheat on is getting big speakers on stands to be at the right height. Try not to, okay?
The first thing to remember is that sound waves reflect off surfaces, like light waves from a mirror.
The angle they hit the surface will be the angle they bounce off. (Remember that; it’ll be important in a minute.)
They bounce multiple times, and the math of how they bounce gets very complicated. Fortunately, you can eliminate a lot of issues just by dealing with waves that only bounce once or twice.
1. Some bounce off the sidewalls and hit your ears directly (the thicker lines); those are the worst, and thankfully the easiest to treat.
2. Some bounce off the back wall behind the speakers and then to your ears (the thinner lines) or off your mixer and to your ears, those are almost as easy to treat.
3. And then there are the ones that get past you – off the walls, floor, and ceiling, into the back of the room, where they hit you from behind.
It is a problem because of the speed of sound. Very roughly and in terms that we can relate to, sound travels one foot per millisecond or one meter per three milliseconds. That puts a time delay on the sound that doesn’t hit your ears directly, with respect to the sound that does.
Even in a small room, that will mean a delay of milliseconds to tens of milliseconds – which is about the delay time range in a typical flanger or chorus.
Those effect pedals combine direct with delayed sound, and the delay causes certain frequencies to cancel out, giving a frequency response that looks like a comb – that’s why we call it comb filtering.
Your room is doing exactly the same thing to your sound: you’re listening to everything through a parked flanger. It won’t be as pronounced as a guitar pedal, but it’s there.
Absorption is key to room treatment and what’s interesting about it is that if you apply it correctly, you don’t need all that much to get significant benefits.
The trick is knowing which reflections to stop, and where they come from.
1. Sit in your mix position and have a friend place a mirror on the side wall. Turn and look at it, and have them slide the mirror across the wall at head height until you can see the tweeter of the nearest speaker in it. Remember what we said about sound waves bouncing the way light does? You now know where to put an absorber on the wall to stop those first bounces!
2. Do it for the other side as well, and you should already hear a significant improvement in your stereo imaging: things seem to ‘lock into place’ more readily, with a clearer phantom image – the sense of hearing a stereo mix emanating from a point between the speakers rather than from two distinct places in space.
3. Look past your speakers: the far wall should be absorptive, at least somewhat, particularly right behind the speakers. A lot of uncontrolled sound comes from behind the speakers, and absorbing it right away is of good benefit.
4. Look up: if you have a flat ceiling, there’s another source of reflections. However, while it’s hard to have a friend moving a mirror while on a ladder, you can imagine where the reflection points will be. To get to your ears from the speakers, they’ll have to hit two places on the ceiling that are actually pretty close to one another. To deal with this, you can hang an absorber over your mix position to absorb those reflections. This is called a cloud, and it takes a bit of effort to install safely, especially if you pick or build a heavy one. If you can’t do it right, do without it – better safe than sorry.
When a sound wave hits an absorber, it has to get inside the absorber and dissipate its energy without leaving again. There needs to be something there to do that, and there has to be enough of it in the right place. This is complicated by the fact that higher frequencies are much more easily absorbed than lower ones.
It’s easy to hang up acoustic treatment on a wall that turns it into an uncontrolled EQ on everything you play, rolling off your highs and doing nothing to correct issues in your mids. All you have to do is hang up treatments that aren’t thick enough!
This brings us to a hard truth:
Acoustic foam panels can be made thick enough to do a good job of stopping highs and mids, but “thick enough” is a pretty big number – about 4” (10 cm). That’s a LOT of foam.
The thinner ones you see in all kinds of pictures of home studios are usually much thinner: 2” (5 cm) or less, which does more harm than good.
Properly thick foam will work, but it’s easier and more effective to use absorber panels – boxes hung on your walls or from your ceiling that hold a certain thickness of fiberglass, covered with fabric.
If you hang one or two of those on each wall, especially in the spot you found with your mirror, that will be the biggest benefit to your overall sound.
They are usually sold as smaller squares or as larger rectangles; you can mix and match to suit your room, as long as you actually cover the right spots. There are also instructions on how to build your own available on the internet if you’re willing to do some work to save some money. You can even paint them to match your furniture or decorate your space – a lot harder to do with foam.
Why would you add more than one pair, if that’s enough to cover direct wall reflections? Because every room benefits from being at least a bit absorptive, to help deal with all the sound waves bouncing around behind you and coming back to hit your ears.
These absorbers will have help from another type of acoustic treatment: a diffuser.
Think of shining a bright spotlight at a mirror ball to put little spots of light all over a room: each of those spots carries only a small amount of the energy in the original beam.
That’s what diffusion is, and that’s what a diffuser does for sound waves.
Placed on the back wall of a room, a diffuser takes reflected sound and scatters it into a bunch of much smaller and less energetic waves that are easily absorbed.
Once again, even a little bit of diffusion can do a lot of good.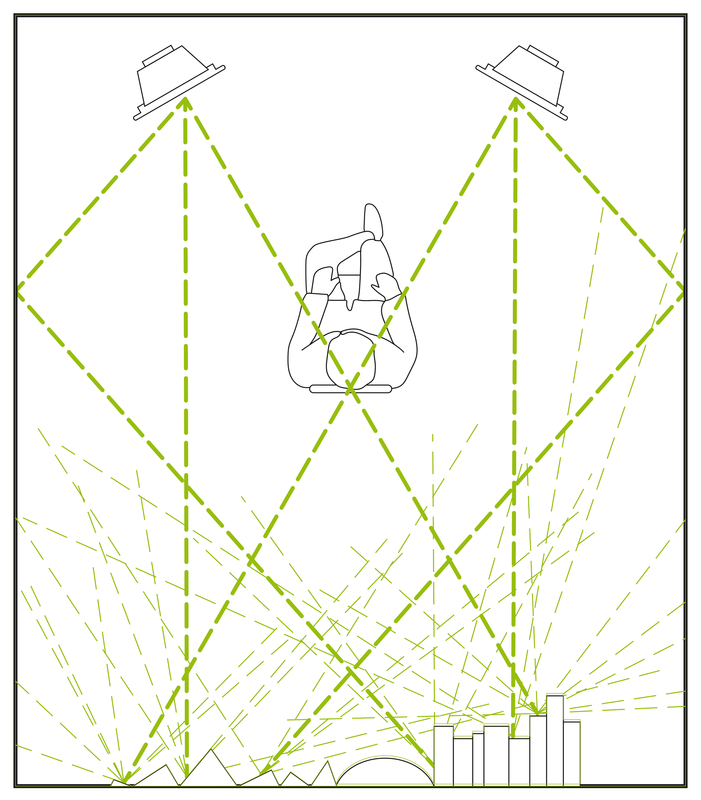
There are many types of diffusers on the market. Some are plastic shells in the shapes of bumps or domes or arrays of pyramids; others look like miniature cities hung on the wall, with blocks of different heights; others look like grids of square holes, some with open backs and others with wood squares inside.
The idea is the same: don’t give sound waves a flat surface to bounce off of. This helps reduce problems like flutter echo, a high ringing sound that results from sound bouncing back and forth between parallel walls.
If you want to build your own diffuser, there’s an easy DIY solution: put up a bookshelf on the far wall of your room and fill it with books of all shapes and sizes, creating a broken-up surface. Note that professionally designed diffusers will work better, but if you like to read and hate piles of books, this is a two-in-one solution!
The solutions above, if you’re careful in applying them, will control your reflection problems down into the lower mids.
BUT, when you start to drop into the bass (below 200 Hz), things get more complicated, because your primary reflection problem becomes resonance.
Lower frequencies have longer wavelengths and higher frequencies have shorter ones. Unfortunately, it happens that for a lot of frequencies in the range of human hearing, there will be somewhere a wavelength (or two, or three…) that will fit perfectly into one of the dimensions of your room: between side walls, between front and back walls, between floor and ceiling.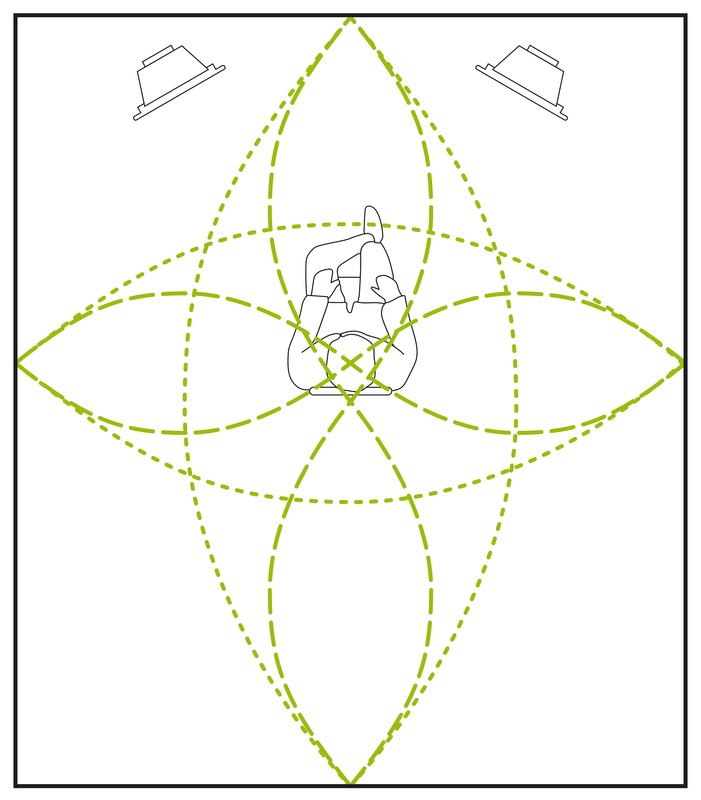
Those are resonant frequencies, or more particularly room modes. There are modes for single bounces, double bounces, and triple bounces; right now we’re focusing on the one-bounce (axial) modes, because they’re the worst, but they’re also the easiest to predict and treat.
Room modes create places in the room where that frequency will be unnaturally loud and other places where it will be unnaturally soft.
Because the engineer must sit in the center of the room to preserve stereo imaging, they will be sitting right where the side-to-side room modes will have the most effect. Those are the blue and red lines.
However, that’s not all. The green and orange lines show room modes from the front to the back of the room. The listener’s head isn’t in the center of those modes, so they’re not quite at a maximum or minimum. What a mess!
The main thing to realize about absorbing bass (bass trapping) is that it requires lots more mass and thickness than for higher frequencies.
Bass traps use specialized designs and placement, and are usually very large – 6” (15 cm) thick at a minimum, and even that won’t control much below 100 Hz.
The science of bass trapping is complicated, but you can find commercial solutions that will help with the problem – or make your own, in the same way as other acoustical treatments.
You can also look into specialized designs like Helmholtz Resonators, which take up very little space and can do a great job in certain rooms. You might not be able to do much in the space you have, but any trapping is better than no trapping.
Don’t worry about overdoing it: unlike absorption at higher frequencies, bass trapping is difficult to overdo in a small room. You can’t fit the traps in the room!
The idea of room correction software is pretty simple: put a microphone where your ears are, play a noise signal or audio sweep tone, hear which frequencies are stronger or weaker, and adjust to correct for them. Easy, efficient, and no need for acoustic treatments, right?
Well, no. Room correction has some uses, but the best ones involve a fair bit of expensive hardware. Smart speakers with built-in DSP for channel delay and very fine EQ treatments will do a much better job than inexpensive off-the-shelf solutions.
Really sharp equalization to correct for problems with a narrow frequency range can add phase issues, and broader EQ affects frequencies around the problem ones. It can help, but it’s not a good substitute for treating your room.
Speaking of headphones, they present an interesting set of acoustical issues. On the one hand, they’re seemingly a solution to every acoustical problem, at least when mixing. They fit over your ears, they don’t disturb anyone, you don’t need a treated room, and you can learn the sound of a good pair to the point where your mixes are reasonably reliable.
However, listening to music on speakers remains essential. Problems can show up that aren’t audible when the two ears’ signals are completely isolated from one another.
It’s always important to check bass balance on real-world speakers, everything from home listening systems to cars and smartphones.
Headphones will take you a long way – but not all the way.
When you want to track vocals or drums in your home studio (or in a borrowed space), acoustics are just as important. What you’re looking for is a sound that enhances what you’re recording, or at least doesn’t harm it.
Here, the central idea is to control the room’s reverb time so it’s not ringy or boomy.
This is done with the same sort of treatments as we’ve discussed in the case of a mixing room. Absorption is important, but diffusion may be even more important, as many living spaces have lots of parallel walls to create flutter echo.
1. If you can’t bring in temporary acoustic treatments for the walls, then you need to control reverb as close to the mic as possible. First and foremost, this is done with placement.
2. Remember our room modes? They’re most influential at walls and in the center of the room, so stay away from the exact center of the room (in any dimension) and away from walls and corners. The higher the ceiling, the better.
3. Remember that a condenser mic picks up the most sound from directly in front of it, which includes sound from behind the vocalist’s head; have the vocalist face the nearest wall, so the mic has the most space behind it without immediate reflections. Mic isolators, which fit around the mic on top of the mic stand, can be handy in a situation where the room sound is still too much.
4. If at first your location doesn’t give you good sound (you are checking before you record, right?), move the mic and try it somewhere else. When you find a good spot, remember it, and mark it if you can.
However, if you just can’t get a good room sound, you should opt for no room sound. This is the time for isolation. If your mic isolator isn’t enough, it’s time to try another room. If you do a lot of vocal recording, consider portable iso booths that remove the sound of the room entirely, so your recording is at least neutral.
Oh, and while we’re talking about isolation...
Notice that in all of this discussion, we haven’t once mentioned noise that gets into your room from outside. It seems like an odd omission since those are the sounds we notice all the time.
The fact is, sound isolation needs to be a much lower priority than acoustic treatment.
First of all, acoustic treatment is meant to repair or reduce all kinds of different problems. Sound isolation repairs exactly one of them: sounds from outside your room getting into your mixes. If you record in an isolated room with bad acoustics, you can't trust your mixes and you’ve gotten close to nowhere. So don't focus on sound isolation first, because acoustic treatment gives a lot more benefits.
Second (and for a lot of novice music makers, a lot more important): proper sound isolation is expensive, difficult, and unless you own a building or rent a space with a very understanding landlord, often simply impossible.
There are strategies for minimizing outside noise, and for keeping your neighbors from killing you for disturbing them, that don't involve heavy construction.
1. Careful scheduling of loud sessions
2. Tracking with headphones when feasible
3. Using isolation booths or cabinets for vocals or guitar amps
4. Software modeling for guitar tracks rather than full-blown amp use
… every little bit helps.
This is a lot of information to take in, but the basic ideas are easy to put to work once you’ve grasped them.
Just remember to take your time, experiment, and get to understand your room(s). You want to fix the problems you have, not the ones you don’t – and a lot of commercial solutions won’t be right for your room.
So make sure the products you use are appropriate for the application; they don’t have to be expensive or fancy, but they do have to work.
When they do, you’ll have the satisfaction of recording better tracks, mixing better songs, and smiling when your friends compliment you and ask what cool new gear you bought to get such great results. Just tell them: “Treat your room!”
Good luck and have fun!
There are many revered acousticians in the music tech industry, but probably the most famous and respected is F. Alton Everest, whose works are considered the gold standard in acoustics education.
The Handbook of Sound Studio Construction: Rooms for Recording and Listening (with Ken C. Pohlmann) covers a lot of the theory and practical suggestions, while How to Build a Small Budget Recording Studio from Scratch (with Mike Shea) gets into actual construction techniques and testing, while providing useful online content to supplement the book.
Oh, and if you want to dive deep and learn from the acoustics reference that’s considered the industry standard, that would be the Master Handbook of Acoustics by F. Alton Everest and Ken Pohlmann. It’s definitely pro-level, but surprisingly clear and easy to follow.
DIY Acoustic Panels: A Step-by-Step Guide to Building Acoustic Absorbers and Diffusers by Marc Rollins-McKie has a wealth of plans for DIY acoustic treatments, at three different levels of difficulty from beginner to advanced. He explains how to install them, too.
The Studio Builder's Handbook: How to Improve the Sound of Your Studio on Any Budget by Bobby Owsinski features tips and tricks, some DIY construction plans, and interviews with a wide variety of studio professionals. Owsinski is a reliable and approachable writer, and his books are easy to absorb.
If you really want to get into a full-on construction job for both acoustical treatment and sound isolation, Home Recording Studio: Build It Like The Pros by Rod Gervais is a one-stop shop for techniques and guidelines. Just make sure you own the house you’re going to work on!
Believe it or not, the websites of companies that sell acoustical treatment products are often the best places to go for advice on planning acoustics for your room. The basic tools they provide are excellent and will guide you to make good decisions on what to buy – or build. This list also includes a couple of blogs and resource sites by respected acousticians.
gikacoustics.com
primacoustic.com
perfect-acoustic.com
realtraps.com
ethanwiner.com
manofacoustics.com
Related stories
How to improve your mixes with 7 steps
Your mix is finally coming together; all the parts sound just right after all those hours you put in. Who needs a break when you are having this much fun? A…
Tips for upgrading your home studio
With all the fancy new and affordable recording tools on the market, it’s easy to be overwhelmed with all the options available. It’s also easy to end up…