
Blog
Blog
So you found the perfect microphone and captured a great acoustic guitar recording. Now it’s time to do some additional processing to bring out the best in your guitar sound and make it fit in your track. In this blog I’ll break down my favorite mixing chain for acoustic guitar and how to approach each stage in your own mixes.
The sound sample I’m using was recorded into Logic Pro with a stereo pair of LCT 140 AIRs using the XY mic technique. (Also check out the microphone placement video). These tips apply whether you record mono or stereo, and should help you achieve more clarity, dynamic control and depth in your recording. Every recording is different, so your specific EQ moves may be different than mine when working with your own tracks.
When processing acoustic guitar, my signal chain consists of four sequential steps.
Subtractive EQ to cut problem frequencies
Compression to control dynamics
Additive EQ and saturation to shape the tone
Reverb to add ambience
What is a signal chain?
In the music world, a signal chain is the order of processing operations performed on your audio signal. In the analog domain it can refer to the patching order of your pedals, synths, preamps, and outboard processing. In the digital domain, we use “signal chain” to refer to the order of plug-ins on your track or mix bus.
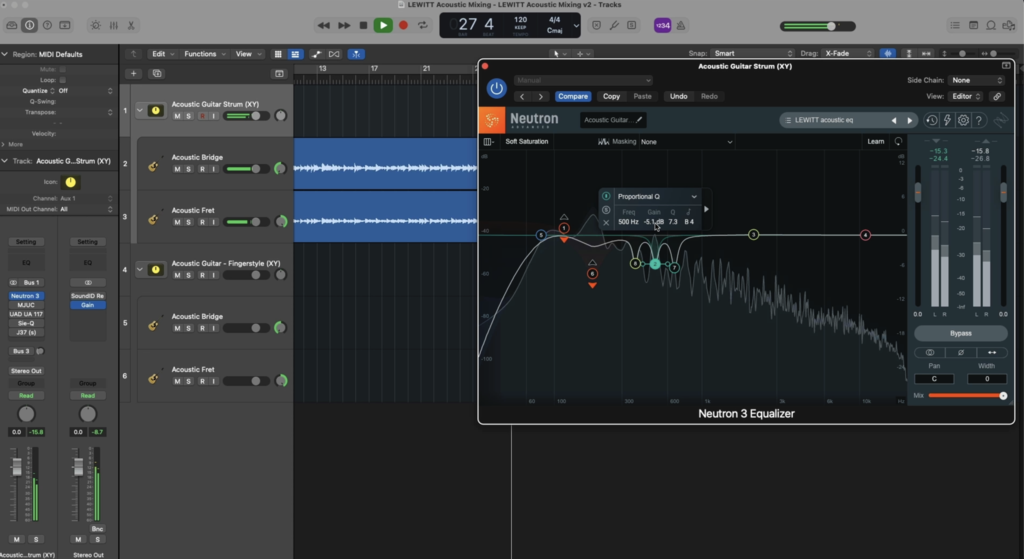
When I say “Problem frequencies” in acoustic guitar recordings I am referring to things like string noise, body resonance, unpleasant room tone, or a combination of these. It’s important to remove these issues in the first stage of your signal chain, which will help your acoustic guitar sound more clear and balanced, ensuring better results after further processing.
What is subtractive EQ?
Subtractive EQ is the method of cleaning and polishing an audio signal by only cutting frequencies with an EQ, as opposed to boosting them. The typical best practice for subtractive EQ is to use it early in the signal chain to ensure problem frequencies don’t get exacerbated by additional processing.
When using subtractive EQ, try to focus your listening on the individual frequency areas of the guitar and how they interact with the rest of your mix. It's important to listen to the guitar in the context of your mix before making EQ decisions. Just because the guitar sounds good on its own doesn't mean it'll sound good in the mix.
It takes some practice, but you may soon start to notice these typical frequency issues stick out:
Low end “boom”
Typically caused by room reverberation, body / string resonance, or proximity effect. A hi-pass filter with a moderate slope placed at 80Hz or so will often solve this problem.
“Mud” or “boxiness” in the low midrange
Also a result of unwanted room tone, this can be a tricky area to work with because many of the desirable resonant frequencies of the acoustic guitar exist here. There are two general areas I usually look to cut—150Hz to 300Hz to remove muddiness and 350Hz to 1kHz for room resonance and unpleasant overtones. Remember you don’t need to cut anything—only the frequencies that are causing problems. In some cases you might even boost the 100-300Hz area with a broad Q in order to bring more warmth to a guitar.
“Brittle” or “harsh” high midrange
Your mic might pick up some overly harsh tones as a result of string squeaks. In our example we left these areas alone, but you might consider using very subtle cuts in these regions if you find your string noise to be overly harsh. A dynamic EQ can come in handy in this situation, since string noise tends to only be undesirable in certain moments, such as when the player strikes a heavy chord or transitions chords.
“Tinny” or “metallic” high end
In rare cases you may notice some unnatural metallic sound in the very highest frequencies. You don’t want to go too crazy here, since you don’t want to remove this important dimension of your instrument. But if this area needs to be addressed you can try a shelf or low pass filter with a gentle slope of 6 or 12 dB/octave between 12khz and 17khz to try and fix the issue.
What is a dynamic EQ?
Like a compressor, a dynamic EQ applies its processing only when the signal level crosses a set threshold. Unlike a compressor, a dynamic EQ works in the frequency domain, applying a filter to the signal rather than directly reducing the gain. This lets you create very precise EQ moves to fix problem frequencies that occur in specific moments of the material.
Here’s an example of the guitar recording before and after the subtractive EQ stage:
The volume level of an acoustic guitar is tied directly to the energy of the player which makes it a very dynamic instrument. Compression is crucial to get it sitting right in your mix.
How do I compress an acoustic guitar?
Since compression has many different uses for acoustic guitar, first think about why you need it. Here are the three main uses for compression in your acoustic guitar signal chain:
Controlling overall dynamics
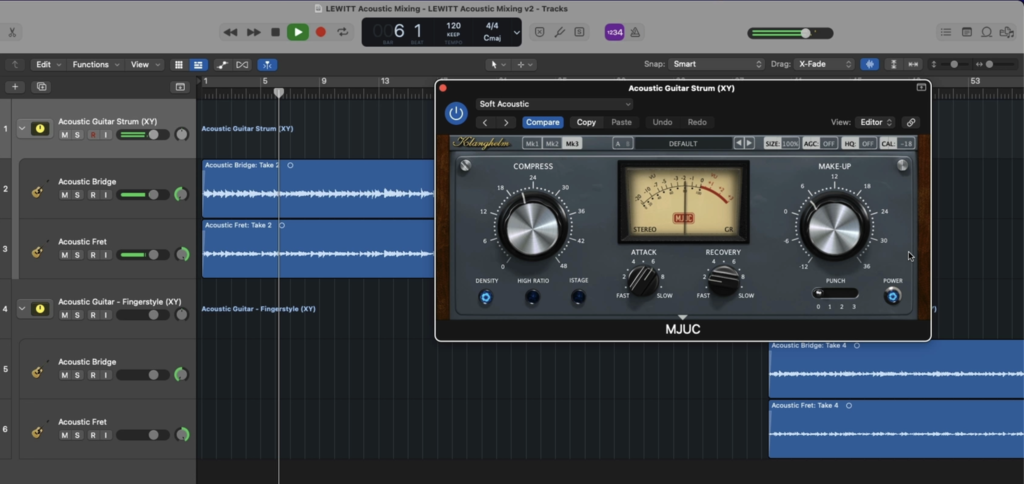
The acoustic guitar recording might need some general “glue” to keep the overall level consistent . To “hold the guitar in place” without squashing the natural dynamics, I’ll reach for a compressor and dial in a slower 15-30ms attack and a faster release of 60-100ms. I’ll use a moderate ratio of 2:1 or 3:1 and aim for2-4db of gain reduction. A slow attack will let the initial transient through while a faster release will bring up more details and sustain.
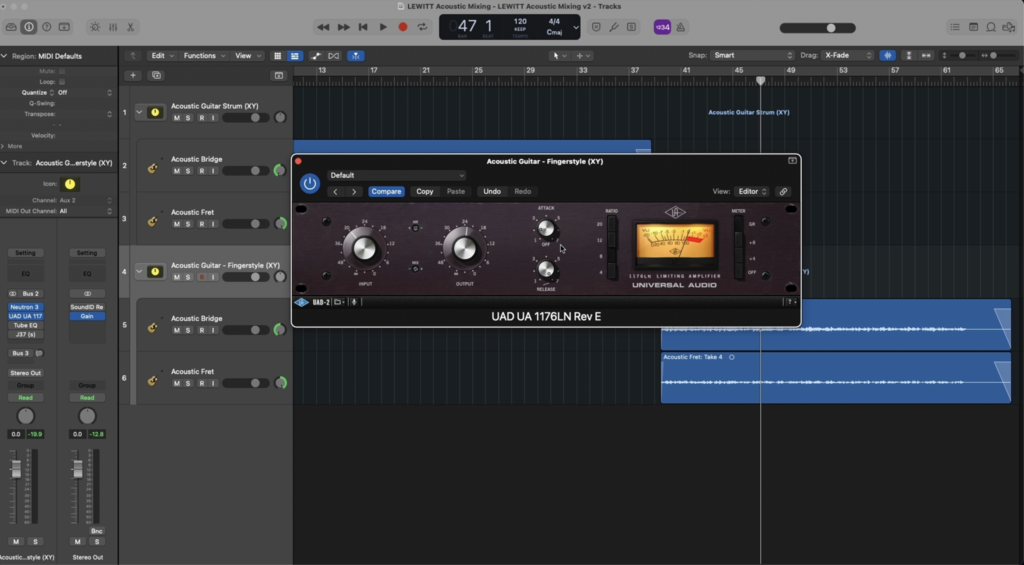
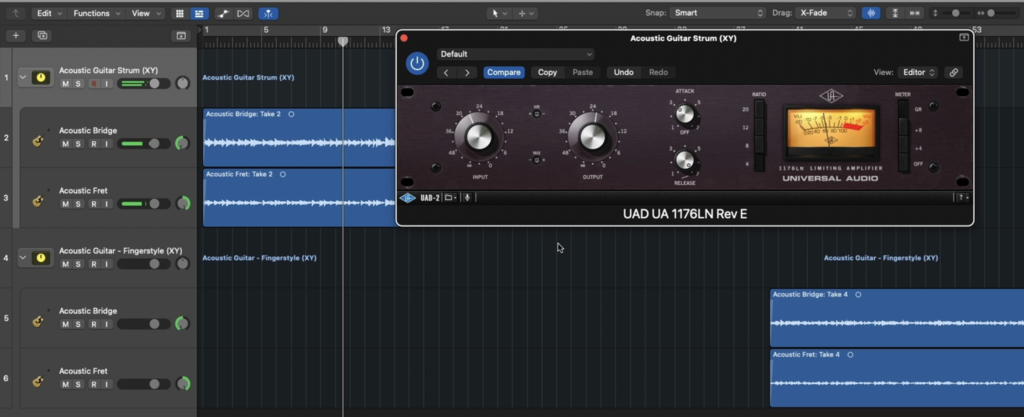
Taming peaks and transients
If the guitar sounds too spiky or certain notes or chords are jumping out, I’ll reach for a fast attack compressor, either a VCA or a FET compressor like the 1176. I’ll aim for a fast attack like 1ms or even faster, and a fast release like 40-50ms. 8:1 ratio. I’ll aim for 1-2db of gain reduction only on the loudest peaks of the signal to smooth it out. This works especially well for fingerpicking when certain notes and percussive sound can pop out more than others.
Adding more color (character compression)
You can also use a compressor to shape your tone and add some energy to your acoustic guitar. For pop or rock mixes, sometimes you need a lot of extra compression for both energy and dynamic consistancy. An 1176 is a great, fast compressor that has a ton of character. I’ll use that at a 4:1 ratio, faster attack and start with the fastest release. 5-8db of gain reduction. Then adjust the blend of dry and wet for parallel compression in order to bring back some of the transients but keep the density and character.
What is parallel compression?
Parallel compression is a method of blending a heavily compressed (wet) signal with the same uncompressed (dry) signal. This lets you benefit from the colorful effects of heavy compression while retaining the natural dynamics of the uncompressed signal. Many compressors feature a parallel “Mix” control that lets you blend the wet and dry signal, or else you can set it up via routing in your DAW.
Here’s an example of the guitar recording before and after the compression stage:
The first two phases above were mostly “corrective” in that they involved cutting out the imperfections of the acoustic guitar recording. Now that we’ve removed some problem frequencies and tightened up the dynamics, we’re free to start adding additional effects that add more color, character, and excitement.
What are the best effects to use?
There are many options you can use at this stage, but in a majority of cases you can rely on EQ, saturation, or a combination of both to give you the best results.
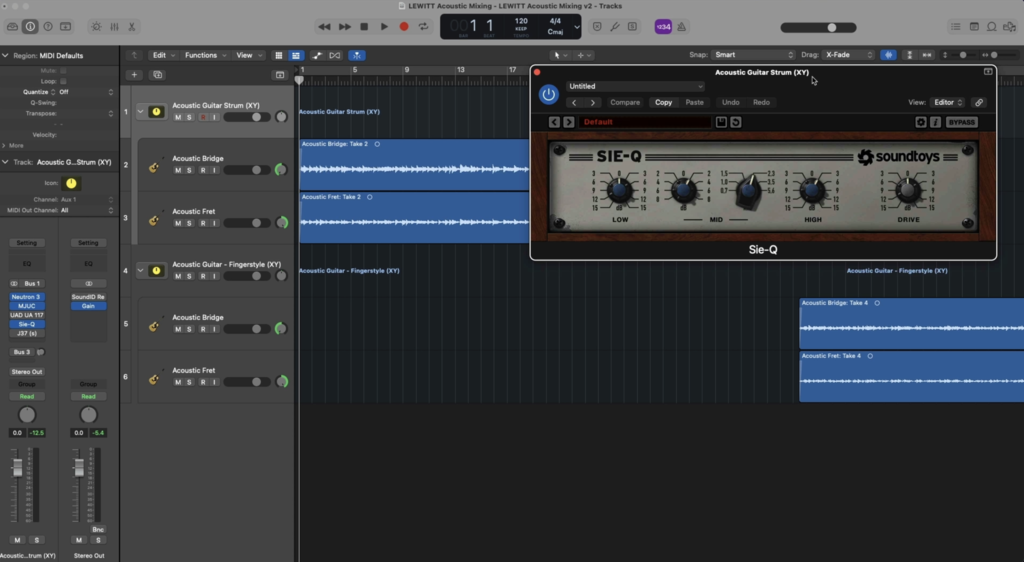
Use EQ to shape tone:
You don’t need to be as surgical with your EQ in this stage. Wider cuts and boosts often work well to accentuate different aspects of your performance. Broad curves sound more natural with less artifacts. In our example I used a colorful EQ called Sie-Q from Soundtoys to add a bit more high end and upper midrange presence. This particular EQ also adds a pleasing bit of saturation, and even gives you an option to boost saturation for adding additional color.
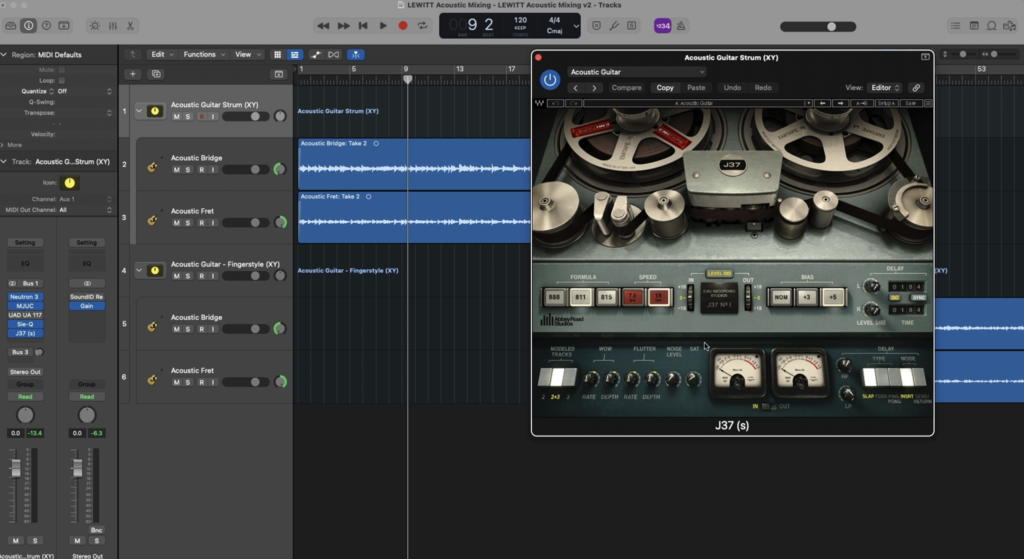
Add saturation for more excitement
A “saturation” effect adds pleasing harmonics to your signal. Tape saturation in particular is highly desirable for acoustic guitar as it adds a bit of density and vibrance, often resulting in a warmer, more “vintage” feel. Compression and certain EQs can also be used to add saturation effects. In my example I used the Waves J37 for this effect, but there are many other options out there that model tape saturation.
Here’s an example of the guitar recording before and after the tone shaping stage:
Now that everything is clean, polished, and sounds exciting and vibrant, we want to place the acoustic guitar in a realistic space. In treated studios, this can be accomplished with additional room mics. But in most cases, you’ll have the microphone placed up close, and so in the mix it may sound somewhat flat or out of place. Reverb is here to help!
How do I use reverb on acoustic guitar?
Reverb really helps place the acoustic guitar in a mix and helps it sound “finished”. Using a subtle reverb can add stereo width (especially with mono recordings) and give it a sense of physical space. Reverb also gives the listener a sense of distance, so the length of your reverb tail can help to determine whether it feels closer or further away.
What reverb works best on acoustic guitar?
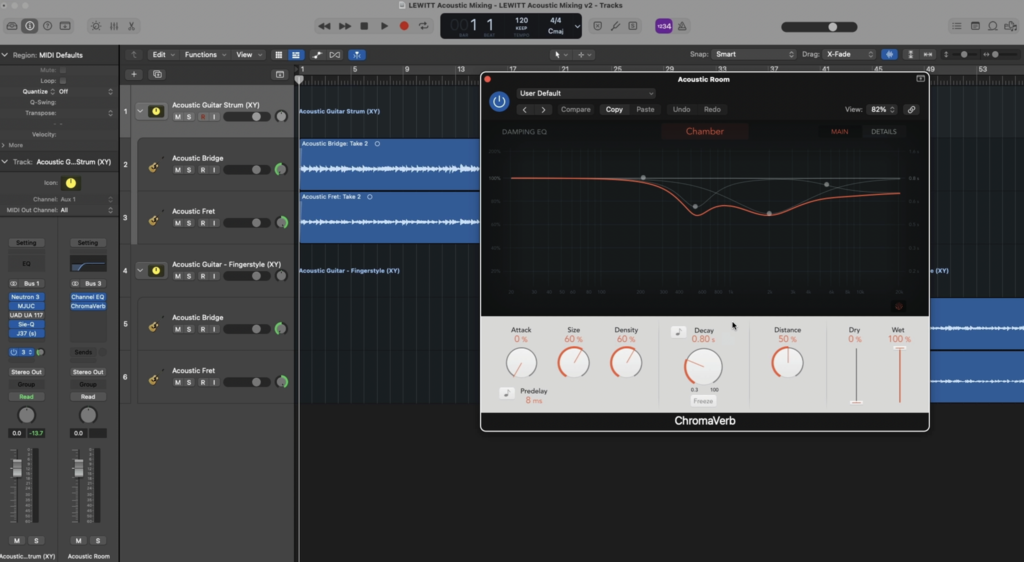
There are so many options out there, and most DAWs even come with several free options that work very well. For the purposes of mixing, it's really a matter of personal taste, and you can get by with the basics. In my example, I used the stock reverb that came with Logic. Most reverbs will offer plenty of preset rooms, halls, and other spaces that can give you a good starting point.
You can also check out our list of free reverb plugins!
What settings should I use?
If you’re looking for a vintage vibe, try a plate or a chamber. For more modern tones, choose realistic rooms or halls. When in doubt, choose a realistic room first, which I did for my example. Room reverbs often have fairly short tails which sound natural and don’t muddy the mix. You can also increase the pre-delay on your reverb to create more separate between the dry and wet signal, causing the guitar to come forward in the mix.
EQing your reverb: More EQ? Yes indeed! You can and should cut resonant frequencies out of your EQ signal. Many reverbs such as the one used in our video have built in EQs that make it easy. Otherwise, you can set your reverb on an auxiliary track. Cut masking frequencies, low or low mids are often a way to clear up the sound and keep the reverb from making the guitar sound muddy.

Related stories
How to record your electric guitar at home
It’s time to take your guitar playing to the next level and record your music. We’re here to help.

Record vocals and guitar at the same time
Recording vocals and guitar at the same time can often yield great, authentic performances from singer-songwriters, but having isolation between the two gives…
How to improve your mixes with 7 steps
Your mix is finally coming together; all the parts sound just right after all those hours you put in. Who needs a break when you are having this much fun? A…

How to record acoustic guitar at home
In this blog, I’m going to be talking about recording acoustic guitar and how to overcome the challenges of working in a home studio. We’ll talk about bad room…
